Difference between revisions of "CLion"
| (2 intermediate revisions by the same user not shown) | |||
| Line 30: | Line 30: | ||
Now, open CLion. Navigate to File - Settings - Build, Execution, Deployment - Toolchains. Under environment, Select “WSL”. Click the gear next to Credentials, and enter in your username and password, ensuring that the correct port number (2222) is used. You will need to change C Compiler and C++ Compilers to use the Raspberry Pi Compilers we installed in the earlier steps. Change the C compiler to use “/usr/bin/arm-linux-gnueabi-gcc” and the C++ Compiler to use “/usr/bin/arm-linux-gnueabi-g++”. The configuration should now look as follows: | Now, open CLion. Navigate to File - Settings - Build, Execution, Deployment - Toolchains. Under environment, Select “WSL”. Click the gear next to Credentials, and enter in your username and password, ensuring that the correct port number (2222) is used. You will need to change C Compiler and C++ Compilers to use the Raspberry Pi Compilers we installed in the earlier steps. Change the C compiler to use “/usr/bin/arm-linux-gnueabi-gcc” and the C++ Compiler to use “/usr/bin/arm-linux-gnueabi-g++”. The configuration should now look as follows: | ||
| − | [[File: | + | [[File:WSLConfig.png|thumb|none|alt=|CLion WSL Configuration on Windows]] |
Once you create and compile a project, you should be able to move it to the Pi using SCP (or PSCP if SCP is disabled), adding the executable flag, and running it. Do not be surprised if there is an error once you’ve built it on the Pi | Once you create and compile a project, you should be able to move it to the Pi using SCP (or PSCP if SCP is disabled), adding the executable flag, and running it. Do not be surprised if there is an error once you’ve built it on the Pi | ||
| Line 48: | Line 48: | ||
Your configuration file should be as follows: | Your configuration file should be as follows: | ||
| − | [[File:UbuntuCLionConfig.png|thumb|none|alt=| | + | [[File:UbuntuCLionConfig.png|thumb|none|alt=|CLion Ubuntu Configuration]] |
Latest revision as of 10:23, 6 February 2020
Overview[edit]
CLion is a cross compilation tool developed by JetBrains.
This section covers installation and configuration of JetBrains CLion on Windows and Ubuntu. It assumes you have a JetBrains Education account, made possible through the Student GitHub Pack.
CLion on Windows[edit]
CLion on Windows for cross compilation requires use of the Ubuntu subsystem. At this point, it’s likely better to dual boot the two operating systems. However, if you’re unable to do this, you can follow through the guide below. A reminder, you don’t need to use CLion - comiplation on Windows is available as pointed out in Section [sec:crosscompile].
In this guide, we’re going to be working with Ubuntu 18.04 as the distribution. To install WSL, follow this tutorial. Be sure to select Ubuntu 18.04 as your distribution.
Once you’ve installed it, you can start the instance by pressing the start button and searching for “Ubuntu”. Upon first run, you will be asked to create a username and password. Remember these details, as they will be used later. Once you have created your username and password, run the following commands:
$ sudo apt-get update
$ sudo apt-get ugrade
$ sudo apt-get install libc6-armel-cross libc6-dev-armel-cross
$ sudo apt-get install binutils-arm-linux-gnueabi libncurses5-dev lib32z1
$ sudo apt-get install gcc-arm-linux-gnueabi g++-arm-linux-gnueabi
Then, configure ssh and relevant/related items using the JetBrains script. Still on the Ubuntu sub-system, run:
$ wget https://raw.githubusercontent.com/JetBrains/clion-wsl/master/ubuntu_setup_env.sh
$ bash ubuntu_setup_env.sh
This script configures an SSH connection on port 2222. Test is by running the following on the Ubuntu Subsystem
$ ssh username@127.0.0.1 -p 2222
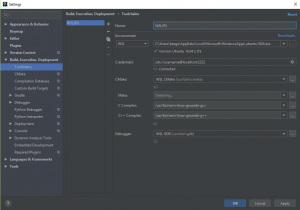
Now, open CLion. Navigate to File - Settings - Build, Execution, Deployment - Toolchains. Under environment, Select “WSL”. Click the gear next to Credentials, and enter in your username and password, ensuring that the correct port number (2222) is used. You will need to change C Compiler and C++ Compilers to use the Raspberry Pi Compilers we installed in the earlier steps. Change the C compiler to use “/usr/bin/arm-linux-gnueabi-gcc” and the C++ Compiler to use “/usr/bin/arm-linux-gnueabi-g++”. The configuration should now look as follows:
Once you create and compile a project, you should be able to move it to the Pi using SCP (or PSCP if SCP is disabled), adding the executable flag, and running it. Do not be surprised if there is an error once you’ve built it on the Pi
CLion on Ubuntu[edit]
CLion on Ubuntu is considerably easier to configure. Install CLion by running
$ snap install clion --classic
RUn the following commands to install required packages:
$ sudo apt-get update
$ sudo apt-get ugrade
$ sudo apt-get install libc6-armel-cross libc6-dev-armel-cross
$ sudo apt-get install binutils-arm-linux-gnueabi libncurses5-dev lib32z1
$ sudo apt-get install gcc-arm-linux-gnueabi g++-arm-linux-gnueabi
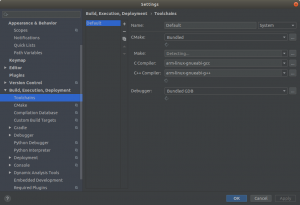
Your configuration file should be as follows:

