Discord
Contents
Overview
Discord is advertised as "chat for gamers", but it is an incredibly powerful communications tool, capable of text, voice and video chat from any operating system or mobile device. The power of Discord comes through bots, plugins which can be used to extend the functionality of Discord's offerings.
Discord is well suited as a lab environment replacement. This was tested in EEE4120F 2020 using the Ticket Tool bot (see more below), as a replacement for lab sessions and was found to be effective, with feedback from student's detailing that the experience was better than Vula chat, emails, and Vula forums. The Ticket Tool bot allows for students to log a ticket, creating a separate chat room where the issue could be handled. Those chat rooms were only visible by the student creating the ticket, and the admins on the server (TA, tutors, etc).
Creating a Discord Account
Creating a Discord account is easy - simply head to the Discord site and follow the prompts.
Creating a Discord Server
To create a Discord server, open Discord, and, on the left hand side of the screen, click the green plus (hovering over this button will give the tool tip "Add a Server"). Once you do so, the server wizard will start, guiding you step-=by-step through the process.
Once you've stepped through the wizard, you will be offered to "Invite friends to <server name>" and be presented with a link. Note that the link given to you will expire in 24 hours, so don't use that one. Instead, at the bottom, select "Edit invite link". A new dialog will show, and under "Expire after", set the link to never expire. Click "Generate a New Link" after doing so. The new link that is generated can be shared among students and anyone else who might want to access the Discord server. Before you do so, you may want to set up a few additional settings.
Creating Roles
Different users in the channel may require different permissions (for example, students vs tutors). In order to handle this, Discord has a "Roles"setting. To access the Discord server settings, select the arrow next to the server name near the top right of the screen, and then select "Server Settings". You will be presented with the server settings. Note that for each server, the permissions for that server are isolated from other servers. So if you are creating multiple servers, you will need to create Roles and edit permissions for each server.
In this example, we're going to create a "SupportStaff" role, for the TA, tutors and any other support staff on the server. We're going to give this role additional permissions and allow them to handle relevant admin-related tasks on the server.
On the left hand side of the Settings screen, select "Roles". To the left of that, above the "@everyone" tag, there is test saying "ROLES" with a plus symbol next to it. Select that plus symbol. It will automatically create a role called "new role". Change the name of this role to whatever you wish ("SupportStaff" in this example), and then set the following permissions to True:
- Display role members separately from online members
- Administrator
- View Audit Log
- Manage Channels
- Kick Members
- Manage Nicknames
- Manage Messages
- Mute Members
- Deafen Members
- Move Members
- Priority Speaker
Then select "Save Changes"
Creating Channels and Categories
A Discord server consists of Channels, which are divided into Categories. By default, Discord has a "Text Channels" category with a "general" channel, and a "Voice Channels" Category and with a "General" channel. Channels and categories are a great way of organizing the server, and enabling a structure that makes the server and it's purpose easy to understand. It must be noted that permissions of channels are, by default, inherited from the category they are in (though it is possible to customize individual channel's permissions).
For sake of an example, we're going to create a "Admin" Category, and in it create a custom text channel which only the support staff can see.
To create a category, right click anywhere on the left hand side channel display and select "Create Category". Give the category the name "Admin", and set it to be a private category. Select "SupportStaff" as the group that can access the category, and click "Create Category". You will see in the left hand channels list, there is now a category called "ADMIN". Select the cog icon, and set the following permissions to true:
- Send Messages
- Add Reactions
- Speak
- Video
- Use Voice Activity
Discord Bots
Discord bots enable a world of additional functionality. The below bots are some that are considered useful to using Discord as a lab replacement tool, enabling classroom-like functionality, and allowing better engagement between students and the support staff.
Ticket Tool
Ticket Tool is a bot that allows students to create private chat rooms, viewable only by them and the support staff. This is a nice way for students to ask questions privately in a way that easily allows privacy, feedback and easy communication without following long email chains.
Once your server is created, navigate to the ticket tool website, and click "Invite Ticket Tool". You will need to log into Discord through the site, in order for TicketTool to get access to the servers you manage. You can then select your server to invite Ticket Tool. Leave the permissions as they are, and click "Authorize". Once authorized, Ticket Tool will be added to the server. Add it to the support staff role you created by right clicking on the Ticket Tool user, hovering over "Roles" and checking the "SupportStaff" check box.
Once that is done, head back to [tickettool.xyz Ticket Tool Website], and select "Manage Servers". Select your course server. and on the right hand side of the screen, select "Panel Configs". Panels are how students will interact with the bot. Select "Create a panel".
TODO: COME BACK TO AFTER CREATING CUSTOM CHANNELS
[Show/hide] Pollmaster
Poll Master is a poll bot which can be added to the server. There are many poll bots available, but Poll Master seems to be the most feature rich.
Pollmaster enables the following functionality:
- Voting works with reactions (users don't need to type anything)
- Anonymous voting is possible
- You can hide the current vote count to prevent sheeping
- Polls can be single choice, multiple choice or restricted to a specific number of choices
- You can prepare polls in advance and schedule them to a date and time or manually activate them
- Polls can be given a deadline or they can be open until closed manually
- You can restrict which roles are allowed to participate
- You can assign weights to roles to count their votes more or less
- Polls are persistent and will be available until you delete them
- Personalised info for each poll by reacting with ❔
- Everything can be done in private chat with the bot to reduce spam on the server
- For advanced users: Commandline support to create a full poll in one line -> pm!cmd help
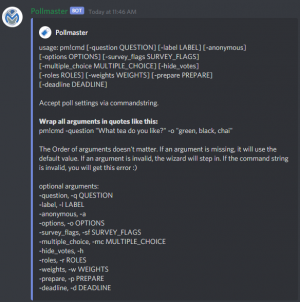
A good way to create a poll is using the pm!cmd command. This allows full control over the poll and it's options, as shown by typing pm!cmd help.
As an example, a command to ask for rating the usefulness of the Discord server might look as follows:
pm!cmd -q "How useful is the Discord server on a scale from 1-5, with 5 being most useful?" -o "1, 2, 3, 4, 5" -a
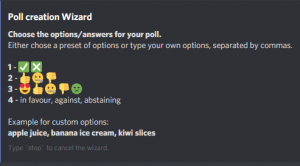
There are default options which can be used by setting the "-o" option to 1 through 4, as shown in the image below:
So, the usefulness question could be asked as
pm!cmd -q "How useful is the Discord server on a scale from 1-5, with 5 being most useful?" -o 3 -a
to get a rating of 1-5 which will use the emojis.

