RaspberryPi:Networking
There are many ways to interface with the Pi. This page will cover types of network connectivity. For more comprehensive, advanced networking details, see RaspberryPi:AdvancedConnectivity.
Contents
A Brief Overview of Networks
It is useful to have a basic idea of how networks, IP addresses, and subnets work. For this, it it suggested you read this article from Microsoft.
Wireless Connectivity
WiFi connectivity is a useful way of connecting the Pi to the internet as it enables more portability. You can adjust WiFi Connections either before boot, by creating a wpa_cupplicant.conf file on the boot partition, or while the pi is running, either by editing /etc/wpa/wpa_supplicant.conf directly, or using $ sudo raspi-config. Note that the raspi-config method will not work for Eduroam.
Simple Wifi Connections
If the Pi is up and running and you have access to it, you can run $ sudo raspi-config and enable WiFi using that menu, or editing /etc/wpa/wpa_supplicant.conf directly using an editor such as nano. However if you don't have access, you can create a a wpa_supplicant.conf file on the SD card, on the boot partition while it is plugged into another system.
If editing the wpa_supplicant configuration file, the contents should look something like the following:
ctrl_interface=DIR=/var/run/wpa_supplicant GROUP=netdev
update_config=1
country=ZA

network={
 ssid="<Name of your WiFi network>"
 psk="<Password for your WiFi network>"
}
Connecting to Eduroam
Connecting to Eduroam requires a fair amount of configuration which depends on your operating system. Generally though, edits to wpa_supplicant.conf and dhcpcd.conf are sufficient. Note that there are new releases of Raspberry Pi OS, and it is unknown if the edits for Buster are still required.
[Show/hide]
Raspbian Buster
Note: There have been updates to the Buster code base, and roll back of wpasupplicant might not be required. However this is currently unable to be tested due to the lockdown. If someone has the chance to test, please update this page accordingly.
These instructions come from here.
Unfortunately, when you use bleeding edge technology, you may end up cutting yourself. Raspbian Buster updates wpa_supplicant to a version that doesn’t have support for the authentication method used by Eduroam. So we need to roll back wpa_supplicant to an older version. Ensure your Pi has internet access through a method such as Ethernet passthrough, and run the following:
$ sudo apt-get remove wpasupplicant
Edit /etc/apt/sources.list :
$ sudo nano /etc/apt/sources.list
And change
deb http://raspbian.raspberrypi.org/raspbian/ buster main contrib non-free rpi
to
deb http://raspbian.raspberrypi.org/raspbian/ stretch main contrib non-free rpi
Run
$ sudo apt-get update
$ sudo apt-get install wpasupplicant
This will install the correct version of wpa_supplicant. Check that version 2.4 is installed by running
$ wpa_supplicant -v
Now, change the sources file back.
$ sudo nano /etc/apt/sources.list
And edit the contents to contain
deb http://raspbian.raspberrypi.org/raspbian/ buster main contrib non-free rpi
Finally, run
$ sudo apt-get update
To update sources The correct version of wpa_supplicant should now be installed, and you can configure your Pi for WiFi as you would if you were using Raspbian Stretch as explained in below.
Raspbian Stretch
This section provides the instructions on how to configure the Pi to use Eduroam. It is possible to do using the GUI through VNC, but we will not cover that here.
SSH into your Pi.
Generate a hash for your password. Take note of it as it is needed in a later step
$ echo -n your_uct_password_here | iconv -t utf16le | openssl md4
Open /etc/wpa_supplicant/wpa_supplicant.conf
$ sudo nano /etc/wpa_supplicant/wpa_supplicant.conf
Edit it so it looks as follows:
    ctrl_interface=DIR=/var/run/wpa_supplicant GROUP=netdev
    update_config=1
    country=ZA

    network={
    ssid="eduroam"
    key_mgmt=WPA-EAP
    identity="studentnumber@wf.uct.ac.za"
    password=hash:generated_hash_from_earlier
    }
Save the file
Open
/etc/dhcpcd.conf$ sudo nano /etc/dhcpcd.conf
Make sure the following lines are in the document:
interface wlan0
metric 200
Reboot your Pi
WiFi Generally takes a little longer to initialize than Ethernet, so give it time. You can see if it’s ready by running
$ ifconfig
And seeing if an IPv4 address (“inet”) has been given.
Test your configuration by pinging from the WiFi interface:
$ ping google.com -I wlan0
Ethernet Connectivity
Ethernet is the physical connection made using a CAT 5 or 6 cable - though there are ways that Ethernet can be mimicked over USB (see Details on the Pi 0 and 0W for more information).
If you're on a private network, connecting your Pi will usually just assign it an IP address and internet connectivity automatically works. If you're on a linux-based system, like Ubuntu, you can use the hostname of the Pi to connect. By default this is "raspberrypi", so you could SSH in using "SSH pi@raspberrypi". However, in most cases, you'll want to know the IP address and assign a static IP address.
Static IPs
Setting a static IP makes it easy to access the Pi and ensures that the IP address of the Pi is always known. In this course, we assign the Pi an IP address of 192.168.137.15. The reason for this is that when using Ethernet Passthrough on Windows, Windows asserts a domain of 192.168.137.x, with the host PC being assigned 192.168.137.1. Keep in mind that all devices will need to be on the same subnet though, so if you're assigning a static IP to be used on your own Ethernet network, you need to know what the subnet of that network is.
Setting a static IP on your Desktop
Windows
[Show/hide]
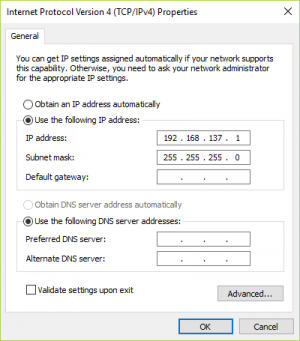
To change the IP of your Ethernet port on Windows 10, complete the following steps:
- Right click on your network option in Windows taskbar
- Select “Open Network & Internet Settings”, on the lower right hand side of the screen.
- Select “Change Adapted Options”
- Right click on the Ethernet Connection and select “Properties”
- Select “Internet Protocol Version 4 (TCP/IPv4) and click ”Properties"
- Select “Use the following IP address:” and enter in the following options:
- IP Address: 192.168.137.1
- Subnet Mask: 255.255.255.0
- You have successfully changed the IP of the Ethernet card on your computer. It is suggested that you now ensure connectivity by attempting to ping the Pi.
Ubuntu
[Show/hide]
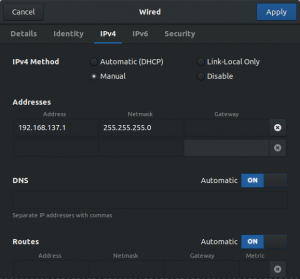
To change the IP of your Ethernet port on Ubuntu, complete the following steps:
- Click the network interface icon on the status bar and select Wired Settings
- Click the gear button of the interface you’d like to change
- Select the IPv4 Tab, and change the IPv4 method to Manual
- Under “Addresses” enter in the following:
- IP Address: 192.168.137.1
- Subnet Mask: 255.255.255.0
- You can leave Gateway and DNS blank
Setting a static IP on the Pi
To set a static IP on the Pi, you have multiple options. You can do it before first boot by addling a line to cmdline.txt on the boot partition of the SD card, or once the Pi is running by editing dhcpcd.
From the boot partition
[Show/hide]
Insert the SD card into your computer and navigate to the BOOT partition
Open “cmdline.txt” and append the following to the line (don’t create a new line)
ip=192.168.137.15
This tells the Raspberry Pi to configure the Ethernet port to use the IP address 192.168.137.15
Enable SSH as per Section [sec:SSH].
You need to configure your PC to use the same subnet as the Pi. To do so, see the information below in the section on Assigning a static IP to the Pi.
In dhcpcd (while the Pi is running)
[Show/hide]
Once you’ve successfully SSH’d into your Pi, it’s a good idea to configure the networking options in the config files directly. You will need to set a static IP on the computer first if you are SSH'ing through an Ethernet connection.
Use a text editor such as nano to open /etc/dhcpcd.conf as sudo user, and edit it to the following:
# Static IP profile for eth0
profile static_eth0
static ip_address=192.168.137.15/24
static routers=192.168.137.1
static domain_name_servers=192.168.137.1 8.8.8.8

# Ethernet interface configuration
interface eth0
fallback static_eth0

# Wireless configuration
interface wlan0
metric 200
WiFi to Ethernet Passthrough
In a situation when you can't or don't want to connect to a WiFi network, but are connected to a computer through an Ethernet port There may be a situation in which you want your Pi to work as an access point rather than using the WiFi interface to provide the Pi with internet access. In this situation, you need to get internet access through the Ethernet port. Before starting, you need to ensure the computer you're using has a static IP assigned. When enabling network sharing on Windows, it automatically assigns 192.168.137.1. Once that's done, complete the following to enable network sharing:
Windows
[Show/hide]
- Ensure the Pi is unplugged
- Right click on your network option in Windows taskbar
- Select “Open Network & Internet Settings”, on the lower right hand side of the screen.
- Select “Change Adapted Options”
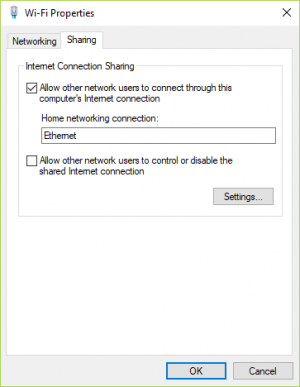
- Right click on your WiFi network and select “Properties”
- Click the “Sharing” tab, and enable the first checkbox <ref>This setting is what forces us to have to use the subnet 192.168.137.x.</ref>
- Select the Ethernet connection that your Pi will be using in the drop down box (Usually just “Ethernet”, but may be different if there are multiple Ethernet posts on your system)
Ubuntu
[Show/hide]
- Ensure the Pi is unplugged and turned off.
- Open a terminal and run
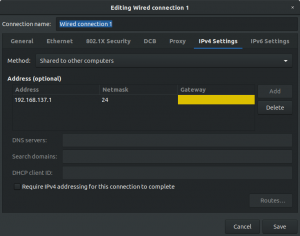
nm-connection-editor - Select the wired connection you’d like to share your WiFi to
- Select the IPv4 settings tab
- Under Method, select “Shared to other computers”
- under the IP addresses, click “Add” and enter in an address of 192.168.137.1, and a netmask of 24
- Select “Save”, and close the windows
- Plug in the Pi, start an SSH session and see if you can ping google.co.za
Ensuring Connectivity
Sometimes you may want to debug your connection to the Pi. A fast way to do this is via the ping command. Ping sends a packet to a particular host (in this case the Pi), and measures the time taken for a response from that host.
To use the ping command, open a command prompt window or terminal and type the following:
$ ping 192.168.137.15
If that host is unreachable (the Pi hasn’t booted yet or is incorrectly configured), a message will show that the host is unreachable. If everything was correctly configured, you should get
Reply from 192.168.137.15: bytes=32 time<1ns TTL=64
This means your Pi and computer are both correctly configured. See section [sec:SSH] for configuring your Pi for SSH access.
NB: Don’t be surprised if you can’t ping a Windows machine from your Pi. Windows blocks the specific type of packet required for a ping in the firewall.
Networking Protocols
For a more detailed overview on useful networking protocols, see Network Protocols
SSH
Enabling SSH
If you have not connected to your Pi and configured it for SSH, you need to do so. SSH is disabled by default on new installations of Raspbian.
To enable SSH, add it as an enabled service in the raspi-config menu. If you do not have access to the Pi as yet, do the following:
- Insert the SD card into a computer
- Navigate to the BOOT partition
- Create a file called “ssh”. Note there is no file extension!
- Your Pi will enable SSH upon next boot
Using SSH
To use SSH on your Pi, you need to connect to the computer to a network. See Section [sec:NetworkingOnThePi] on various ways that can be done (it is suggested to use Ethernet upon first connection).
Once your Pi is connected to the computer and you have ensured connection (see Section [sec:Connectivity-EnsuringConnectivity]), use can log in to your Pi via SSH. If you are on a Linux-based system, such as Ubuntu or Mac, you should be able to run the following. Note that the default username is “pi” and the default password is “raspberry”.
$ ssh <username>@192.168.137.15
If you are on Windows, you may need to use PuTTY. Some instances of windows have SSH in the command line, and you can run the command shown above. But if not, you will need to do the following:
- Open PuTTY
- In the “Hostname” field, enter in “192.168.137.15”
- Click “Open”. A terminal window will be opened. If it is the first time you’re SSH’ing into your Pi on this particular computer, you will be asked about the server fingerprint. Click “Yes” to continue.
- You will be asked for a username and password. The default username is “pi” and the password is “raspberry”.
- You should now successfully connected to your Raspberry Pi via SSH
VNC
To learn about how to install VNC, see
- Ensure the VNC service is enabled on the Pi
- Connect to the Pi through VNC.
- Set your preferred resolution for Raspbian
- In the desktop menu, go to Preferences - Raspberry Pi Configuration and click the “Set Resolution” button.
- Select a more appropriate resolution (1280*720 suggested)
- Select “Okay” and then “Okay”. You will be asked to reboot your Pi, do so.
- Set the VNC resolution
- Through editing /boot/config.txt, uncomment the following lines relating to framebuffer_width and framebuffer_height
- On the desktop on VNC, use the settings. Do this if you have already connected to VNC. This is a little more difficult as it required you to play with windows in order to see the buttons you need.


