RaspberryPi:DebuggingConnectivity
Contents
Debugging Connections[edit]
This section is a work in progress. As more common issues are reported by students, this section will be expanded. It's important to note that most connectivity problems come down to an incorrectly configured file, where you may have missed a space, or misspelled something.
Note for Windows Users[edit]
If you are having trouble accessing the internet from your Pi using the Ethernet Passthrough technique, it’s likely the Windows bridge needs a reset. Change the IPv4 address of your Ethernet port to “Obtain an IP address automatically”, then on your WiFi connection, disable sharing, click okay, and then re-enable sharing. Go back to the IP configuration of your Ethernet post, and double check the IP to see if it’s been assigned 192.168.137.1. If not, you will need to change it using the “Advanced settings” button.
Ping[edit]
Ping sends a packet to a particular host (in this case the Pi), and measures the time taken for a response from that host.
To use the ping command, open a command prompt window or terminal and type the following:
$ ping 192.168.137.15
If that host is unreachable (the Pi hasn’t booted yet or is incorrectly configured), a message will show that the host is unreachable. If everything was correctly configured, you should get
Reply from 192.168.137.15: bytes=32 time<1ns TTL=64
This means your Pi and computer are both correctly configured.
NB: Don’t be surprised if you can’t ping a Windows machine from your Pi. Windows blocks the specific type of packet required for a ping in the firewall.
WiFi[edit]
See if you can see wireless networks.
$ iwlist wlan0 scan
If you cannot connect via WiFi, enter into a shell on the Pi and run:
$ journalctl -u wpa_supplicant | grep wlan0
$ journalctl -u dhcpcd.service | grep wlan0
This will output the log files and notify you of any incorrect configurations in wpa_supplicant.
The following command will force the interface to be up (if it can be):
sudo ifconfig wlan0 up
If all else fails, reboot and try again. Some services can be restarted without restarting the Pi, for example:
sudo systemctl restart dhcpcd
Test wpa_supplicant config by killing the process, and running it in debug mode:
sudo killall wpa_supplicant
sudo /sbin/wpa_supplicant -d -c/etc/wpa_supplicant/wpa_supplicant.conf -Dnl80211,wext -iwlan0
"Failure resolving URLs" or "unknown host"[edit]
If you try to ping a website from the Pi and it fails, but pinging a IP such as 8.8.8.8 works as expected, it is likely an issue with DNS configuration. Open the resolv.conf file:
$ sudo nano /etc/resolv.conf
And edit it to read the following:
nameserver 8.8.8.8
nameserver 192.168.137.1
8.8.8.8 is the IP of Google’s DNS server. A DNS (Domain Name Service) server is responsible for converting human-readable addressed (for example google.co.za) to something the network architecture can understand (172.217.170.67, in this example).
If you still get this error, try running the following command:
$ sudo route add default gw 192.168.137.1
Where the IP supplied is the IP of the computer or router you are connected to.
SSH'ing Into the Pi 0/0W[edit]
This section assumes you've correctly modified the SD card contents using the correct editor, and are using the correct USB port on the Pi.
Windows[edit]
- Open up device manager by pressing the Windows key and X and selecting "Device Manager" from the drop down
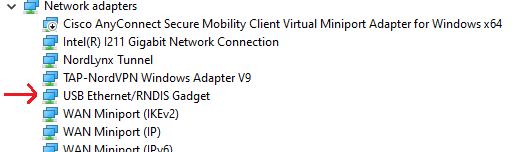
- If you have no other USB to Ethernet Gadgets plugged in, and you see this, it means your Pi is connected correctly and you need to double check you've installed Bonjour and are connecting to the correct hostname.
- If the device manager is constantly "flashing" after giving the Pi enough time to boot, it means there isn't enough power delivery to the Pi. This is only really a problem on older systems. To resolve this issue, add an additional connection from the "power" USB port to something that can provide additional current, like a cellphone charger, or even just another USB port.
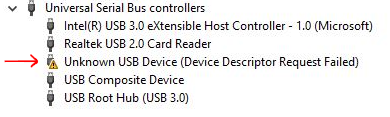
- If under "Universal Serial Bus controllers" you see something like "Unknown USB Device (Device Descriptor Failed)", it means the driver is not installed.
To install the driver, you need to do the following:
- Right click on the "Unknown USB Device" and uninstall the driver.
- Unplug the Pi from your computer
- Download the RNDIS drivers here: Windows 10 RNDIS Drivers
- Extract the contents
- Right click on "RNDIS.inf" and select "install"
- Plug in the Raspberry Pi again, it should be picked up as a USB Ethernet Device under "Network Adapters"


Ubuntu[edit]
Some Ubuntu systems are unable to perform the IP lookup based on the hostname. Follow the instructions here to connect.
The instructions above were converted into a script. Before running the script, you need to set IPv6 of the Pi's ethernet connection to link-local only, and get the name of the interface using ifconfig.
The script is as follows:
set -e
echo "Ensure you've set IPv6 to link local only"
echo "Ensure you know the interface on which the Pi is located"
echo "Use the ifconfig command to get the interface. Often 'usb0'"
echo "Trying to resolve raspberrypi.local"
resolved=`avahi-resolve-host-name raspberrypi.local`
piIP=`echo $resolved | cut -c 19-128`
echo "Please enter in the USB interface"
read interface
echo "Attempting to SSH into pi@$piIP%$interface"
ssh pi@$piIP%$interface
Once you've connected, it's suggest you connect to a wifi network to be able to SSH in using "pi@raspberrypi.local", or set a static IP on the USB port and use the same subnet on the network created on the PC when you plug in the Pi.