RaspberryPi:RTC
Contents
RTC on the Pi[edit]
The Raspberry Pi can make use of a kernel driver to handle an RTC (Real time clock). This page was written for use with the MCP7940 IC. Adaptations may be required for different RTC ICs.
The Pi doesn’t come with an RTC, and instead uses a daemon service called fake-hwclock to handle the time. But, seeing that we have an RTC, we can use that instead. And by supplying an external current (from, say a CR2032, a common coin cell battery for RTCs), we can hold the time even while the Raspberry Pi is off and doesn’t have internet access.
Note: This guide was tested on a fresh install of Raspbian Stretch, but should work fine on Buster, too.
Build the Circuit[edit]
Build the RTC circuit and connect it to your Pi
SSH in to your Pi
Run the following. We’re using the MCP7940, which means we expect a result at address
0x6f$ gpio i2cdetect
Configure the Pi[edit]
Run the following:
$ touch rtc.sh
$ chmod +x rtc.sh
Using your favourite text editor, place the following script into
rtc.sh
Take note when a red arrow appears below, you need to ensure that the text after the arrow is on the same line as the line above it (i.e. a red arrow just shows a line is split, the text should be on one line)#!/bin/bash # UniPi driver setup # https://forum.unipi.technology/topic/171/mcp7491x-jessie/3 # Modified for the MCP7940x if [ "$EUID" -ne 0 ] then echo "This script must be run as root" exit fi echo Backup files cp /boot/config.txt /boot/config.txt.bak echo Enabling I2C bus... if ! grep -q '^dtparam=i2c_arm=on' /boot/config.txt then echo 'dtparam=i2c_arm=on' >> /boot/config.txt fi if ! grep -q '^dtparam=i2c_baudrate=400000' /boot/config.txt then echo 'dtparam=i2c_baudrate=400000' >> /boot/config.txt fi echo Enabling the RTC chip... if ! grep -q '^dtoverlay=i2c-rtc,mcp7940x' /boot/config.txt then echo 'dtoverlay=i2c-rtc,mcp7940x' >> /boot/config.txt fi echo Getting i2c development tools apt-get install -y i2c-tools if ! grep -q '^i2c-dev' /etc/modules then echo 'i2c-dev' >> /etc/modules fi echo Removing fake-hwclock... apt-get purge -y fake-hwclock update-rc.d -f fake-hwclock remove apt-get autoremove -y sed -i '/^if \[ -e \/run\/systemd\/system/,/^fi/s/^/#/' /lib/udev/hwclock-set echo ' ' echo 'UniPi installed.' echo ' ' echo '!!! REBOOT IS REQUIRED !!!' echo ' ' read -p "Is it OK to reboot now? [y/N] " -n 1 -r echo ' ' if [[ $REPLY =~ ^[Yy]$ ]] then reboot else echo 'Reboot to finish configuring drivers' fi echo ' 'Run the script as sudo, as follows:
$ sudo ./rtc.sh
The script will prompt you to reboot. Do so.
Test the Hardware[edit]
Once rebooted, SSH in to your Pi
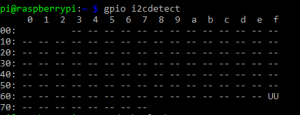
Run the following. We’re using the MCP7940, which means we expect a result at address
0x6f$ gpio i2cdetect
instead of the address “6f”, you should see “UU”
Test the Software[edit]
And now for the fun stuff:
Check if we can see the hwclock. Depending on whether or not you’re connected to the internet, you should see an arbitrary time
$ sudo hwclock -r
Assuming you have internet connectivity, your Pi should fetch the time through NTP
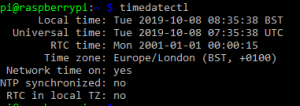
Check the various times the Pi has access to:
$ timedatectl
Depending on whether or not you’ve connected to the internet, your results can look quite varied:
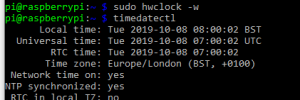
Connect your Pi to the internet and reboot so you can get the NTP time as shown in Figure [fig:rtcwint].
Set the System time to the RTC:
$ sudo hwclock -w
$ timedatectl


